It’s finally here: the third and final blog post about Azure automation. The first blog covered how to automate Azure using Runbooks, the second blog post showed how to do it using Azure Functions, and this blog post will cover how to do it using Azure Elastic jobs.
To be fair, I titled this blog “Automating Azure with Elastic Jobs”, but Elastic Jobs isn’t part of Azure Automation, so please don’t get confused. The goal with this is to demonstrate how to automate some Azure database DBA tasks.
What are Elastic Jobs?
Like my two previous blog posts and their respective topics, this blog isn’t a deep dive into Elastic Jobs. This isn’t an “Intro to Elastic Jobs” blog post. That is at least one or more blogs itself, and the purpose of this blog isn’t to dive deep into Elastic Jobs. Additionally, Elastic Jobs is in Preview, which means things may change.
Elastic Jobs allows you to run T-SQL scripts across multiple databases, in parallel. Yeah, totally cool. So for us at SSG, we have multiple clients that have their database environment in Azure, and they came to us asking how to do index maintenance. Well, HERE YA GO!
As I stated in my previous two blogs, those solutions work just as well. I’ve given you some options, and one solution might fit your environment better than the others. In fact, we have several clients using Runbooks or Azure Functions.
The way Elastic Jobs works is that you create jobs that are executed against one or more Azure SQL databases, and those jobs run T-SQL queries to perform the defined tasks. As part of setting up the Elastic Job, you define a set of target databases against which the job or jobs will be executed. Additionally, you can define schedules for those jobs. Pretty sweet.
So, with that foundation, let’s build an Elastic Job to optimize indexes.
Getting Started
Before we get started, I should mention there is a REALLY sweet demo of this on Microsoft Learn here. So why am I covering it in this blog? Simple. The example on Microsoft Learn creates EVERYTHNG needed for the demo. And I mean EVERYTHING, including databases, resource groups, the whole 9 yards. It is a great way to get started with Elastic Jobs if you are new to it. I ran the demo just to get familiar with it. So if you want to just learn about Elastic Jobs, stop reading, click the link above, and enjoy.
However, in my scenario, I already had the databases, resource groups, and some of the other objects, so I needed to tweak the demo to fit my needs. Essentially, this tells the script “hey, I already have some of these things, so don’t do x and y”.
To get started, we need a few things:
- A couple of Azure SQL databases
- Ola Hallengren’s index optimize script
- An Azure Elastic Job Agent
- The Az PowerShell module
Create the Databases
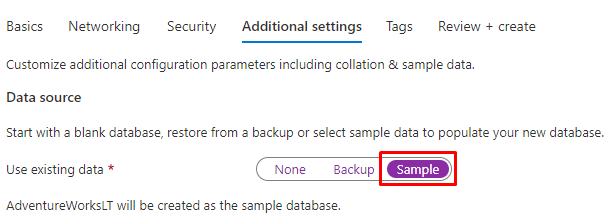
For this blog, I simply created two new General Purpose databases, based off of the Sample database.
Run the Scripts
With the databases created, the next step is to add the appropriate components to the database to do the index optimization. We at SSG are huge fans of Ola Hallengren and his Maintenance Solution, and you can get his awesome scripts here.
The IndexOptimize.sql script will run in Azure, but you will also need to download the CommandLog.sql and CommandExecute.sql files as well. Run all three of those in the database you just created. Start with the CommandExecute.sql, then the CommmandLog.sql, then the IndexOptimize.sql.
Create the Elastic Job Agent
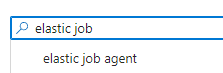
With everything prepared, the next step is to create the Elastic Job agent. In the Azure Portal, create a new resource, and in the search box type “elastic job” in the search bar and select elastic job agent.
Click Create.
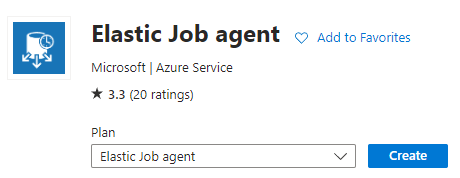
It is pretty straight forward; give the agent a name and select the same subscription in which you created the sample databases, then click Review + Create.
PowerShell
If you read the Microsoft Learn doc I linked to above, it shows how to create the appropriate objects using PowerShell. There is a similar tutorial which does everything in T-SQL. This blog will use PowerShell, but you can do the same thing in T-SQL.
For what I needed, I copied everything from the doc into PowerShell, then started hacking. I cut what I didn’t need, modified some things, and tested and tested until it worked the way I wanted it. The code below represents the final results.
This code assumes you already have a resource group, Azure SQL Server, and some other things. It does create the JobDatabase database, which I am OK with, but other than that, it just creates all the Elastic Job stuff. As an FYI, the job database is the database the job agent uses to store job related data, job definitions, etc. It is recommended that this database be a clean, empty database, at an S1 service level or higher. Thus, my code below creates a brand-new database for this.
In this example, I create a group, which by default adds all the databases on the server, but then I tell it to EXCLUDE the jobs database. You can see that I have lines of code which are commented out that add the two sample databases. I could not get those two lines of code to work for the life of me, and I’ll attribute that to the fact that this is in preview. The only way I could get it to work was to create the group but exclude the jobs database.
At the very end, the code creates a job, then creates a schedule for that job. The job creation specifies the T-SQL to run, which is the index optimize stored procedure. There is also commented code at the end which will start a new execution of the job if you would like, otherwise it will kick off at the scheduled time.
NOTE: As noted earlier, you will need the Az PowerShell module. An important note here is that the very first line imports the Az module, so if you haven’t previously installed this PowerShell module, you will need to do so by executing Install-Module Az.


Import-Module Az
Connect-AzAccount -Subscription '<your azure subscriptionid>' -Tenant '<the Tenant ID>'

$resourceGroupName = "<your existing resource group name>"
$adminLogin = "<your Azure SQL Server login>"
$adminPassword = "< your Azure SQL Server password>"
$adminPasswordSecure = ConvertTo-SecureString -String $AdminPassword -AsPlainText -Force
$adminCred = New-Object -TypeName "System.Management.Automation.PSCredential" -ArgumentList $adminLogin, $adminPasswordSecure
$agentServer = "<your Azure SQL Server>"
$ejagentName = "<Your Elastic Job Agent name>"

# create the job database
Write-Output "Creating a blank database to be used as the Job Database..."
$jobDatabaseName = "JobDatabase"
$jobDatabase = New-AzSqlDatabase -ResourceGroupName $resourceGroupName -ServerName $agentServer -DatabaseName $jobDatabaseName -RequestedServiceObjectiveName "S1"
$jobDatabase

Write-Output "Getting databases..."
$db1 = Get-AzSqlDatabase -ResourceGroupName $resourceGroupName -ServerName $agentServer -DatabaseName "database1"
$db1
$db2 = Get-AzSqlDatabase -ResourceGroupName $resourceGroupName -ServerName $agentServer -DatabaseName "database2"
$db2


Write-Output "Creating job agent..."
$agentName = $ejagentName
$jobAgent = $jobDatabase | New-AzSqlElasticJobAgent -Name $agentName
$jobAgent

# in the master database (target server) create the master user login, master user, and job user login
Write-Output "Creating logins and users..."
$params = @{
  'database' = 'master'
  'serverInstance' =  $agentServer + '.database.windows.net'
  'username' = $adminLogin
  'password' = $adminPassword
  'outputSqlErrors' = $true
  'query' = 'CREATE LOGIN masteruser WITH PASSWORD=''<provide a password>'''
}
Invoke-SqlCmd @params

$params.query = "CREATE USER masteruser FROM LOGIN masteruser"
Invoke-SqlCmd @params
$params.query = 'CREATE LOGIN jobuser WITH PASSWORD=''<provide a password>'''
Invoke-SqlCmd @params

# for each target database
# create the jobuser from jobuser login and check permission for script execution
$targetDatabases = @( $db1.DatabaseName, $Db2.DatabaseName )
$createJobUserScript =  "CREATE USER jobuser FROM LOGIN jobuser"
$addrolememberScript = "EXEC sp_addrolemember 'db_owner', 'jobuser';"

$targetDatabases | % {
  $params.database = $_
  $params.query = $createJobUserScript
  Invoke-SqlCmd @params
  $params.query = $addrolememberScript
  Invoke-SqlCmd @params

}

# create job credential in Job database for master user
Write-Output "Creating job credentials..."
$loginPasswordSecure = (ConvertTo-SecureString -String '<enter a password>' -AsPlainText -Force)

$masterCred = New-Object -TypeName "System.Management.Automation.PSCredential" -ArgumentList "masteruser", $loginPasswordSecure
$masterCred = $jobAgent | New-AzSqlElasticJobCredential -Name "masteruser" -Credential $masterCred

$jobCred = New-Object -TypeName "System.Management.Automation.PSCredential" -ArgumentList "jobuser", $loginPasswordSecure
$jobCred = $jobAgent | New-AzSqlElasticJobCredential -Name "jobuser" -Credential $jobCred


Write-Output "Creating test target groups..."
# create ServerGroup target group
$serverGroup = $jobAgent | New-AzSqlElasticJobTargetGroup -Name 'ServerGroup'
$serverGroup | Add-AzSqlElasticJobTarget -ServerName $agentServer -RefreshCredentialName $masterCred.CredentialName
$serverGroup | Add-AzSqlElasticJobTarget -ServerName $agentServer -DatabaseName $jobDatabase.DatabaseName -Exclude
#$serverGroup | Add-AzSqlElasticJobTarget -ServerName $agentServer -DatabaseName $db1.DatabaseName -RefreshCredentialName $masterCred.CredentialName
#$serverGroup | Add-AzSqlElasticJobTarget -ServerName $agentServer -DatabaseName $db2.DatabaseName -RefreshCredentialName $masterCred.CredentialName


Write-Output "Creating a new job..."
$jobName = "IndexOptimize"
$job = $jobAgent | New-AzSqlElasticJob -Name $jobName -RunOnce
$job

Write-Output "Creating job steps..."
$sqlText1 = "EXECUTE [dbo].[IndexOptimize] @Databases = 'USER_DATABASES', @UpdateStatistics = 'ALL', @LogToTable = 'Y'"

$job | Add-AzSqlElasticJobStep -Name "Index Optimize User Databases" -TargetGroupName $serverGroup.TargetGroupName -CredentialName $jobCred.CredentialName -CommandText $sqlText1


Write-Output "Scheduling the job..."
$job | Set-AzSqlElasticJob -IntervalType Day -IntervalCount 1 -StartTime ('11/23/2022 20:00:00') -Enable
#$job | Set-AzSqlElasticJob -IntervalType Hour -IntervalCount 1 -StartTime ('11/17/2022 10:00:00') -Enable   #set to  hour for testing

#Write-Output "Start a new execution of the job..."
#$jobExecution = $job | Start-AzSqlElasticJob
#$jobExecution
And there you have it, you have successfully created an Azure Elastic Job to automate your index optimization.
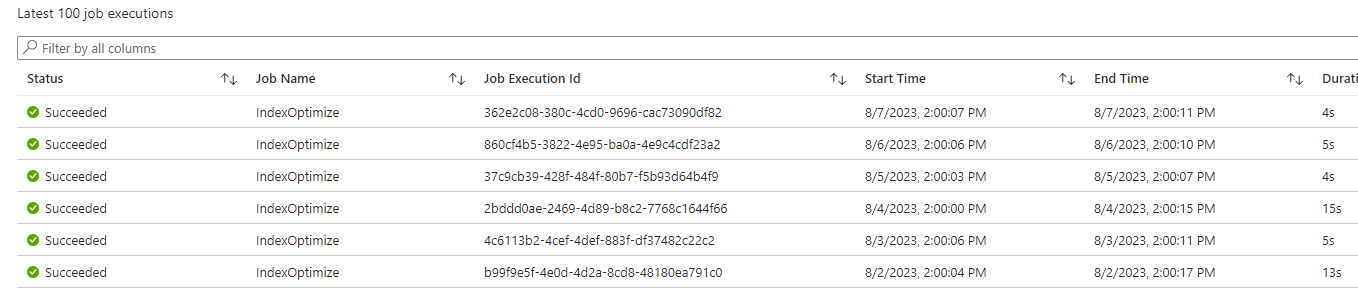
Selecting the Elastic Job agent in the portal, on the Overview page you will see the last 100 job executions:
Selecting the Jobs page will list all the jobs associated with the Elastic Job agent.

Pros and Cons
Having worked with this for a while, there were some things that I want to highlight in terms of what I liked and some areas that could be better.
I’ll start with the Cons. I’m not a PowerShell guru so it took me a while to get the PowerShell exactly right. A part of that struggle could be, again, that this is in preview and so everything isn’t completely “baked”. Additionally, the UI isn’t the best but I know Microsoft is working on that and should have a better UI experience once released.
In the “pros” category, I like the fact that there is no timeout issue that you have with Runbooks and Azure Functions. That is awesome. I also love that you can create a group, add and remove databases from it, and done. Run your stuff against one or more databases. BAM! Lastly, you can do all of this in either PowerShell or T-SQL. Slick.
Reading the last couple blogs posts was probably an eye sore, as there were a ton of steps to get Azure automation created, etc. For Elastic Jobs, a couple of clicks, done. Again, the hard part was getting the PowerShell correct.
Summary
This blog post just scratches the surface of what Elastic Jobs can do, but we often see companies not doing index maintenance in Azure because either they don’t know how to do it or it is too difficult. Hopefully this will help get people going.
Hey, if you need help with any of this, ping me! I’m happy to help!


This Post Has 11 Comments
Pingback: Index Maintenance in Azure SQL DB with Elastic Jobs – Curated SQL
Hi! I just finished reading the 3 posts and I really enjoyed it. I regret not finding it earlier because I already tested creating an Azure automation runbook and an Azure function and this would have saved me time.
In my case, the Azure automation runbook didn’t work because it exceeded 3 hours.
My question is about pricing, which one do you think is cheaper for index maintenance, elastic job or azure function premium plan?
Thank you
Hi Andre, given that Elastic Jobs is still in preview, it is hard to say. I would think Elastic Jobs will GA very soon, so after that we should know more about pricing.
Azure Elastic Jobs is a great service for running SQL scripts on a bunch of Azure databases in one go. We have built a Visual Studio extension (Azure Elastic Jobs Manager) to manage Azure elastic jobs from your desktop.
https://marketplace.visualstudio.com/items?itemName=AzureOps.elasticjobsmanager22
Hi Scott, Is this still working in the released version of Elastic Jobs? Having some trouble following your guide…
I haven’t tried it but I will and report back.
Hi Scott, can elastic job handle adding new databases without having to roll out security privileges to the new database so, that operations are seamless like on-premise? We have found that the index maintenance fails until we add the required security privileges to the new database even though the credential has administration permissions.
Hi Philip, good question. I do not know, but I will test and let you know.
Hi Scott,
Is it possible to get this updated for the latest modules and Azure updates in current day? I tried this script and i’m getting errors like:
Creating logins and users…
Invoke-SqlCmd : The term ‘Invoke-SqlCmd’ is not recognized as the name of a cmdlet, function, script file, or operable program. Check the spelling of the name, or if a path was included, verify that the path is correct and try
again.
At line:40 char:1
+ Invoke-SqlCmd @params
+ ~~~~~~~~~~~~~
+ CategoryInfo : ObjectNotFound: (Invoke-SqlCmd:String) [], CommandNotFoundException
+ FullyQualifiedErrorId : CommandNotFoundException
and having to run Import-Module Az. with -verbose tag. I’m sure there is more since the script is even failing to connect to my tenant given the tenant ID. I would appreciate it very much thanks!
Thanks for the feedback. We will look into updating this for the new modules.
555-1)) OR 530=(SELECT 530 FROM PG_SLEEP(15))–
Comments are closed.