Database files (mdf, nds, ldfs, etc.) can get out of hand quickly and easily, leading to issues down the road. This can be due to improper planning, large data loads, and bad code run in production, just to list a few. As unglamorous as disk space monitoring is, we need to do our part as DBAs. This post is a quick guide on how to track database file sizes with PowerShell.
Getting Started
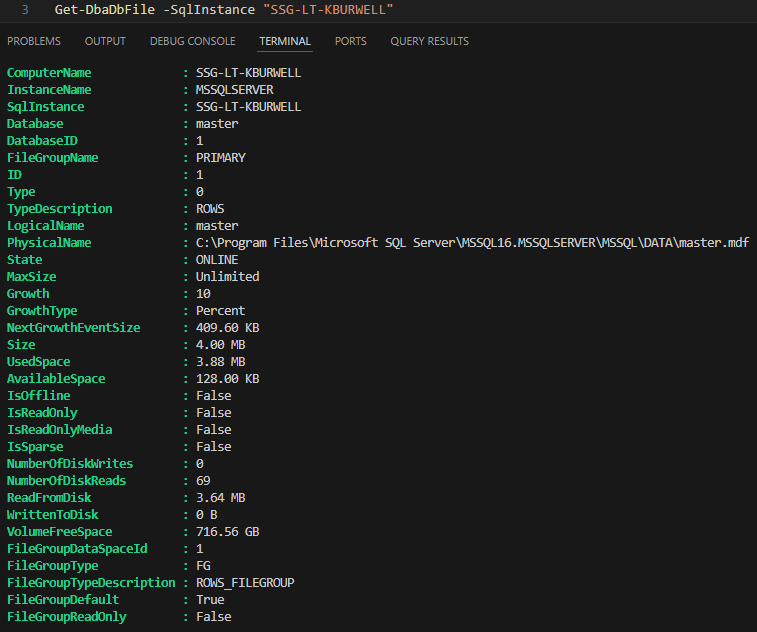
If you haven’t already, make sure you have DBATools installed. We are going to be using a command called Get-DbaDbFile to gather the information for us. This command only requires one parameter, -SqlInstance. Here is a snippet of what I get when I run it against my local dev instance:
This is a bit more information than we really need right now, so let’s trim it down and get some parameters added. For this script, we really only need SqlInstance, Database, TypeDescription, LogicalName, PhysicalName, Size, UsedSpace, and AvailableSpace. We can also exclude system databases from the result set. For readability, I am going to use Format-Table. I will also start to add in some parameters:


$SqlInstance = "SSG-LT-KBURWELL"

Get-DbaDbFile -SqlInstance $SqlInstance

Get-DbaDbFile -SqlInstance $SqlInstance -ExcludeDatabase master,model,msdb,tempdb |

    Select-Object SqlInstance, Database, TypeDescription, LogicalName, PhysicalName, Size, UsedSpace, AvailableSpace | Format-Table
Using Custom Objects
This will be much easier to work with, but it is important to be aware that the columns related to file size have GB, MB, and KB values, depending on what is most appropriate for that file size. This is great when just looking at the data like this, but can be a bit problematic for mathematical comparisons, which we will be doing later. To get around this, we can just use some custom objects:
$SqlInstance = "SSG-LT-KBURWELL"

Get-DbaDbFile -SqlInstance $SqlInstance -ExcludeDatabase master,model,msdb,tempdb |

    Select-Object SqlInstance, TypeDescription, LogicalName, PhysicalName,

     @{Name='DatabaseName'; Expression={$_.Database}},

     @{Name='SizeMB'; Expression={ [math]::Round($_.Size / 1MB, 2) }},

     @{Name='UsedSpaceMB'; Expression={ [math]::Round($_.UsedSpace / 1MB, 2) }},

     @{Name='AvailableSpaceMB'; Expression={ [math]::Round($_.AvailableSpace / 1MB, 2) }},

     @{Name='FreeSpacePercent'; Expression={

    if ($_.Size -gt 0) {

        $sizeMB = [math]::Round($_.Size / 1MB, 2)

        $availMB = [math]::Round($_.AvailableSpace / 1MB, 2)

        [math]::Round(($availMB / $sizeMB) * 100, 2)

        } else { 0 }

    }},

    @{Name='CaptureTimestamp'; Expression={ Get-Date -Format "yyyy-MM-dd HH:mm:ss" }}

    | Format-Table
This converts all sizes to MB, which will make any mathematical operations much easier. I also included a custom object for DatabaseName, FileSpacePercent, and CaptureTimestamp. DatabaseName really just acts as a custom column name, which is necessary when loading the data into SQL.
On To The Comparisons
Now that we are getting only the data we need, we need to save it to a table so we can do point in time comparisons. As with everything else, DBATools makes this ridiculously easy. We just need to point it to an instance and a database, it will take care of the rest. Instead of piping our results to Format-Table, I am going to pipe them to a command that will build and load a SQL table:
$SqlInstance = "SSG-LT-KBURWELL"

$WriteInstance = "SSG-LT-KBURWELL"

$WriteDB = "DBA"

$WriteTable = "FileSizesAndUsage"

Get-DbaDbFile -SqlInstance $SqlInstance -ExcludeDatabase master,model,msdb,tempdb |

    Select-Object SqlInstance, TypeDescription, LogicalName, PhysicalName,

     @{Name='DatabaseName'; Expression={$_.Database}},

     @{Name='SizeMB'; Expression={ [math]::Round($_.Size / 1MB, 2) }},

     @{Name='UsedSpaceMB'; Expression={ [math]::Round($_.UsedSpace / 1MB, 2) }},

     @{Name='AvailableSpaceMB'; Expression={ [math]::Round($_.AvailableSpace / 1MB, 2) }},

     @{Name='FreeSpacePercent'; Expression={

    if ($_.Size -gt 0) {

        $sizeMB = [math]::Round($_.Size / 1MB, 2)

        $availMB = [math]::Round($_.AvailableSpace / 1MB, 2)

        [math]::Round(($availMB / $sizeMB) * 100, 2)

        } else { 0 }

    }},

    @{Name='CaptureTimestamp'; Expression={ Get-Date -Format "yyyy-MM-dd HH:mm:ss" }}

    | Write-DbaDbTableData -SqlInstance $WriteInstance -Database $WriteDB -Table $WriteTable -AutoCreateTable
Now I have the data in SQL Server:

With this information being collected regularly, via scheduled task or agent job, we can easily trend out how much our database files are growing. It will also make potential misconfigurations stand out, such as a 1TB mdf with 99% free space. Personally, I use it in client environments to find over-allocated files that can be shrunk to reclaim some space. I know, “shrink bad”, but sometimes you just need to do it. As you can see, it’s quite straightforward and rather easy to track database file sizes with Powershell!


This Post Has One Comment
Why would anybody want to use PowerShell to accomplish this?? 🤷♂️ You have a SQL Server – you got T-SQL.