Overview
There are times when you must protect and secure data within SQL Server . SQL Server Always Encrypted is a feature which helps protect sensitive data, such as social security numbers or credit card numbers, providing confidential computing capabilities.
Always Encrypted provides a separation between those who own the data and can view it, and those who manage the data but should have no access. Always Encrypted does this by allowing clients to encrypt sensitive data inside client applications while never revealing the encryption key to the database engine.
One of our clients utilizes Always Encrypted to protect sensitive data. In our work for this client, we realized that a walkthrough documenting the end-to-end process of enabling Always Encrypted would be helpful for everyone.
The Environment
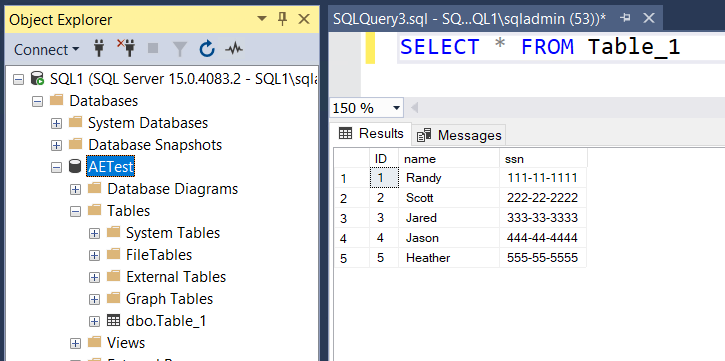
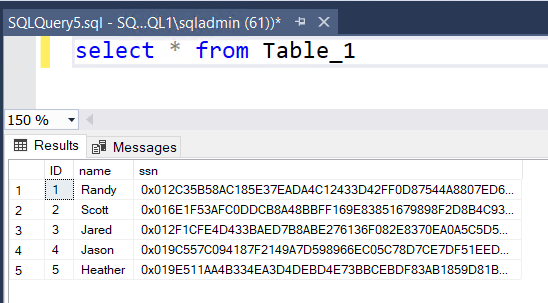
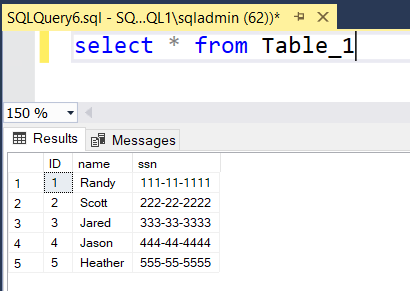
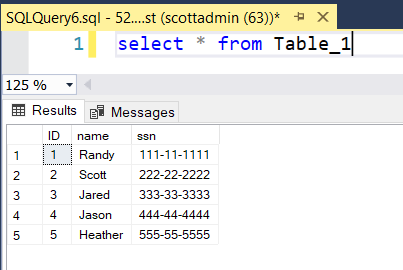
Before enabling SQL Server Always Encrypted, let’s first define the sample environment. In this example, a database named AETest contains a simple table called Table_1 with three columns: an ID column, a name column, and an SSN (social security number) column. In this example, we want to encrypt the SSN column. Currently, we have not enabled column encryption, so all SSN numbers show as plain text.
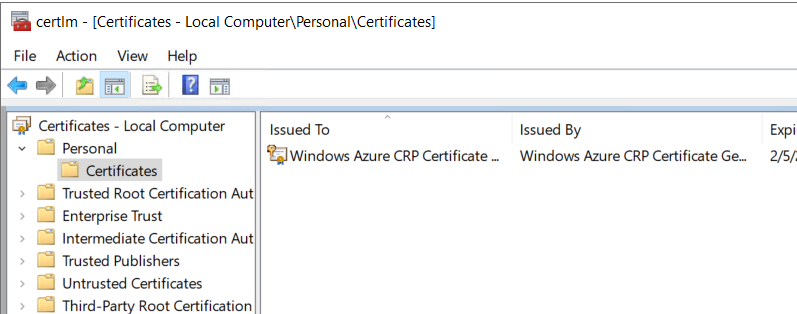
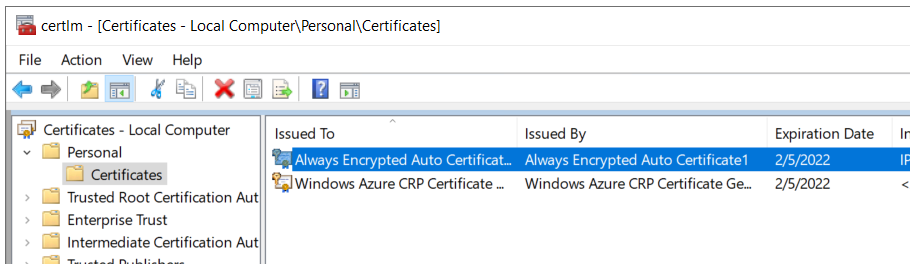
A quick look in the certificate store shows no certificates associated with Always Encrypted in the Local Computer certificate store.
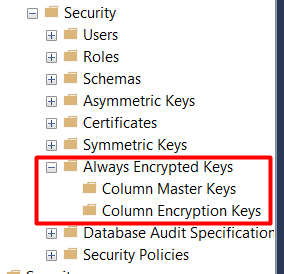
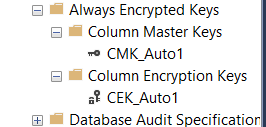
Lastly, a quick look at the Always Encrypted Keys shows we haven’t created any Column Master or Column Encryption keys. This validates that no columns have been encrypted in this database.
Encrypting Columns with SQL Server Always Encrypted
This section will provide details about encrypting columns using Always Encrypted. This is on the server side, and the next section will continue the walkthrough on the client side.
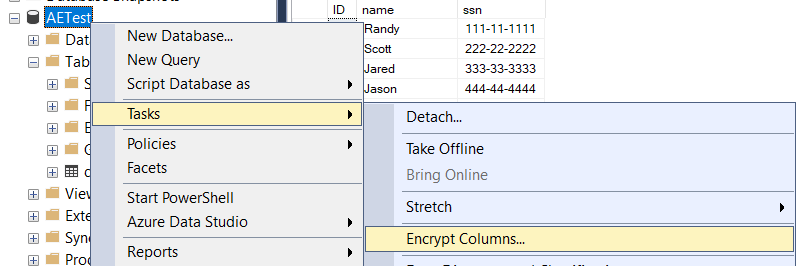
The first step to encrypting columns with Always Encrypted is to select the columns you wish to encrypt. Right click on the database name and select Tasks -> Encrypt Columns from the context menu, which will start the Always Encrypted wizard.
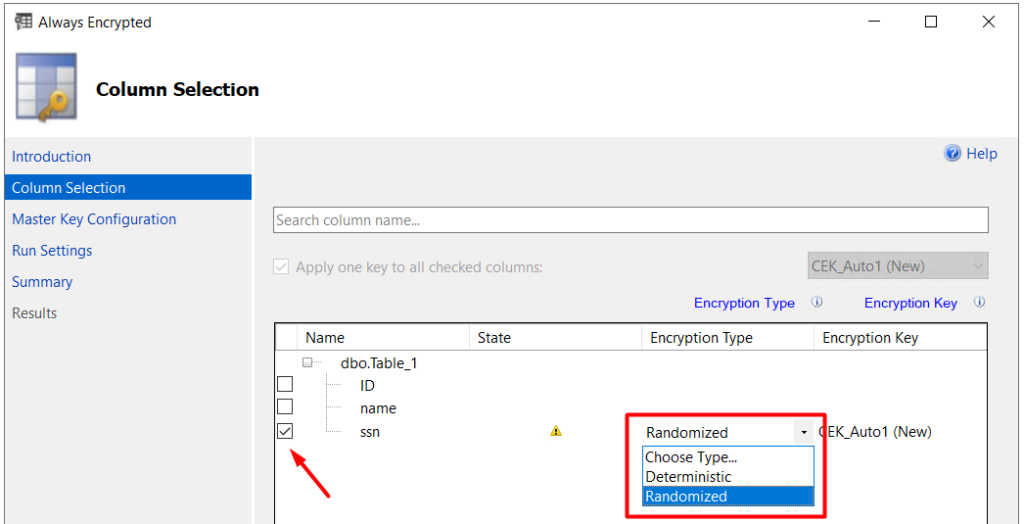
In the Always Encrypted wizard, click Next on the Introduction page. On the Column Selection page, select the column or columns you wish to encrypt. In this example, select the SSN column from the Table_1 table.
Next, select the Encryption Type. There are two encryption types:
- Deterministic: Always generates the same encrypted value for any given plain text. Allows for joins, grouping, and indexing on encrypted columns but may allow unauthorized users to guess information about encrypted values.
- Randomized: Encrypts data in a less predictable manner. This is more secure, but prevents searching, grouping, indexing, and joining on encrypted columns.
We can’t change the Encryption Key name, so click Next.
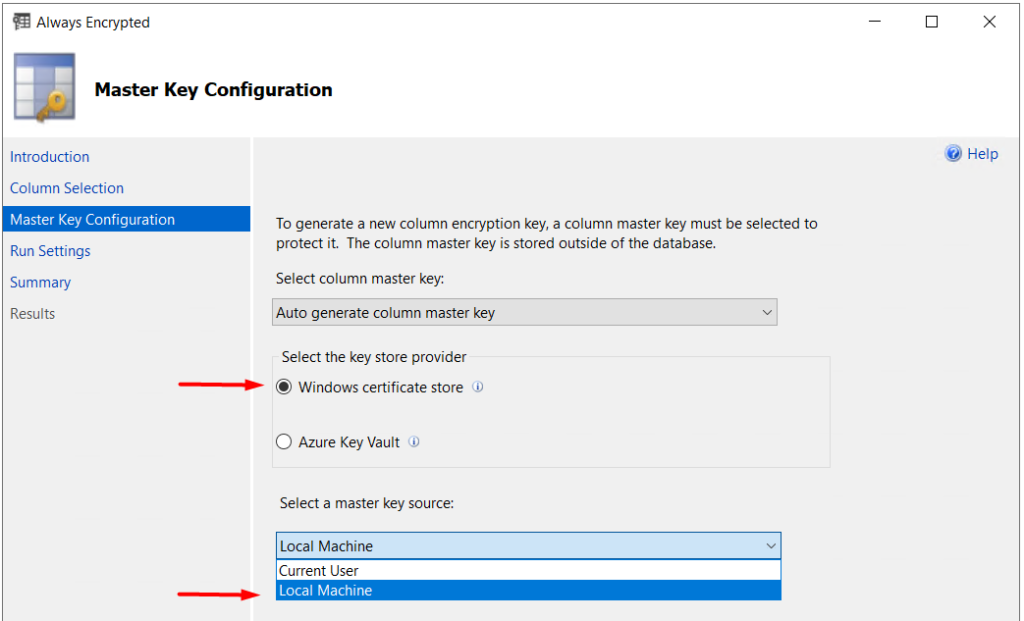
In the Master Key Configuration page, select the Windows certificate store as the key store provider. Then select Local Machine as the master key source. Click Next.
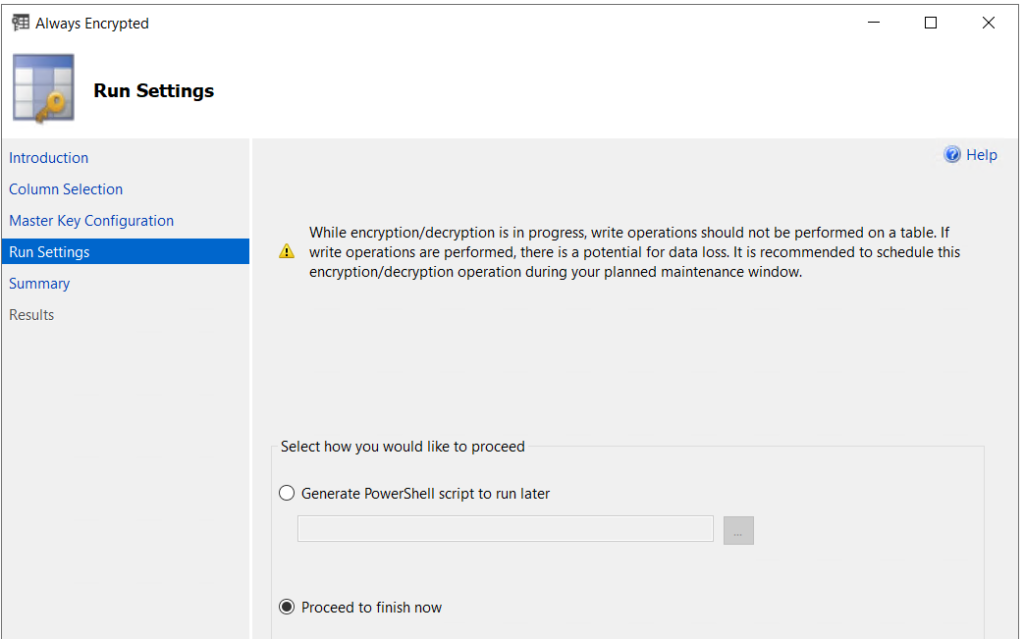
On the Run Settings page, select the Proceed to finish now option. The Generate PowerShell script option lets you save the steps in PowerShell script to execute at a later time. This might come in handy when you want to implement Always Encrypted during off-hours, or save the script to reference in the future. Click Next.
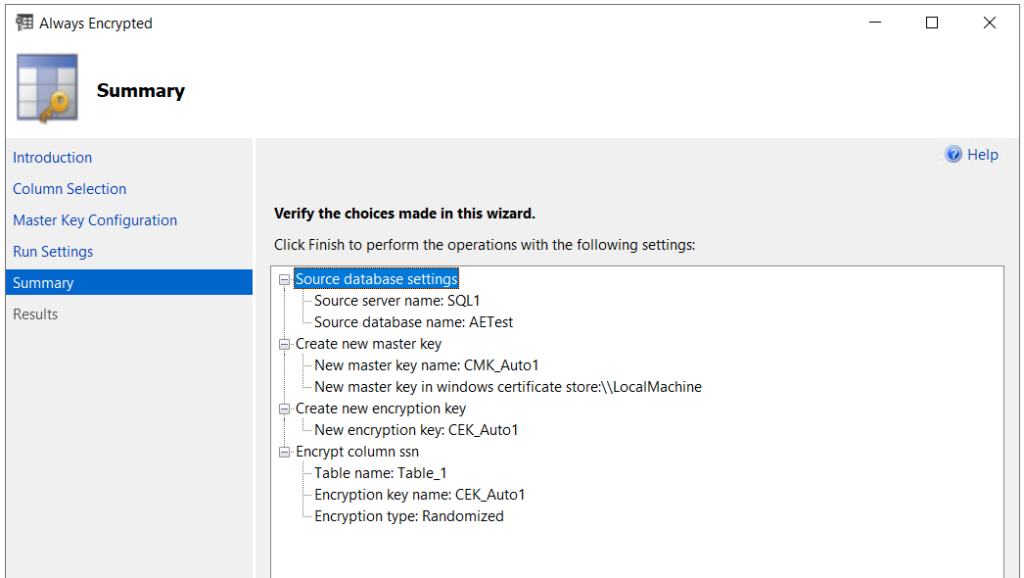
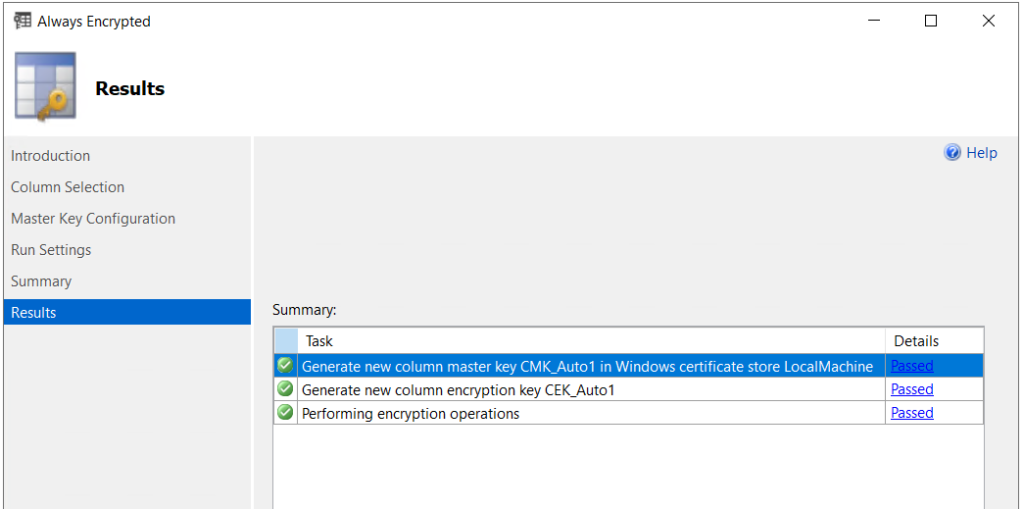
On the Summary page, review the steps and operations to perform, then click Finish.
Depending on the number of columns to encrypt and the size of the table (number of rows), the encryption process could take a little bit of time. The Results page will show the progress of each step. Once each task has completed, click OK on the Always Encrypted wizard.
Always Encrypted on the Server
Now that the selected column or columns have been encrypted, we can verify its implementation and functionality by doing another check of the keys and certificate. Refreshing the Column Master Keys and Column Encryption Keys nodes in SQL Server Management Studio in the AETest database, we can see the generated Master and Encryption keys.
- Column Encryption Key: Used to encrypt data in an encrypted column
- Column Master Key: Key-protecting key that encrypts one or more encryption keys.
We can also see a new certificate in the Personal\Certificates store for the Local Computer specific to Always Encrypted.
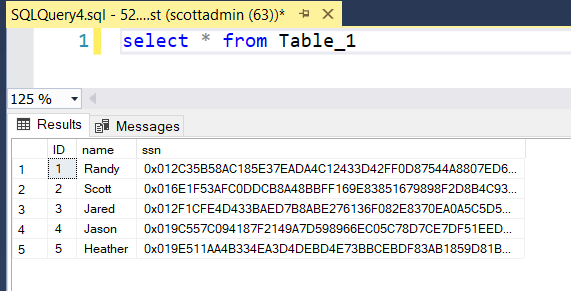
Using SSMS on the server and connecting to the Server, we can open a new query window and query Table_1, showing that the SSN values are indeed encrypted. Close the query window.
In SQL Server Management Studio, disconnect from the server, and then click the connect button to reconnect.

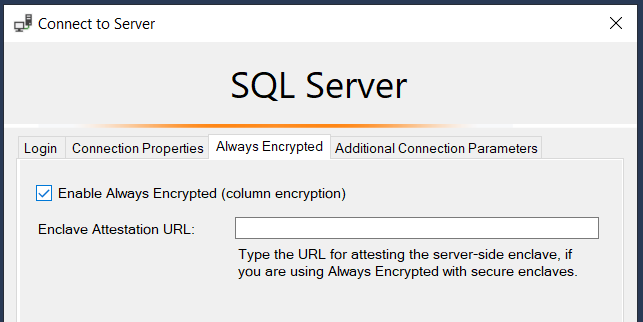
Before connecting, switch to the Always Encrypted tab and click the Enable Always Encrypted (column encryption) option, as shown in the screenshot below. Go back to the Login tab and click Connect.

Select the appropriate database, in this example AETest, and open a new query window. Query all the records from Table_1. The query now returns the SSN values in plain text.
This scenario demonstrated how to use Always Encrypted while operating on the local server in which you have enabled Always Encrypted. In the following section, I’ll outline how to enable and use Always Encrypted at the client.
Enabling and Using Always Encrypted on a Client
In this example we used the local certificate store to store the column master key. In order for clients (other computers) to see the encrypted data in plain text, each client will need the key. Thus, we will export the key.
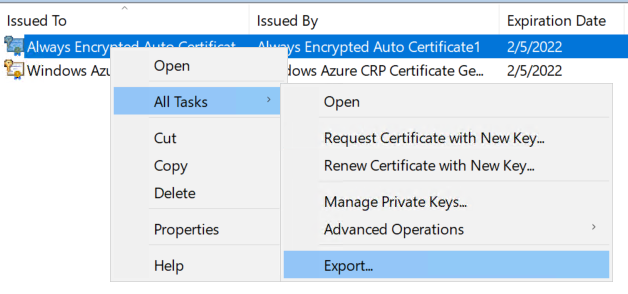
On the server in which you have Always Encrypted enabled, navigate to the store where you’ll find the Always Encrypted certificate (probably Local Computer\Personal\Certificates). Right click on the Always Encrypted certificate and select All Tasks -> Export.
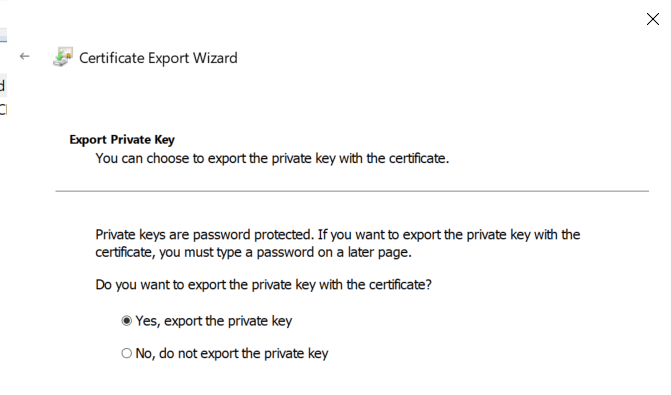
In the Certificate Export Wizard, select the Yes, export the private key option and click Next.
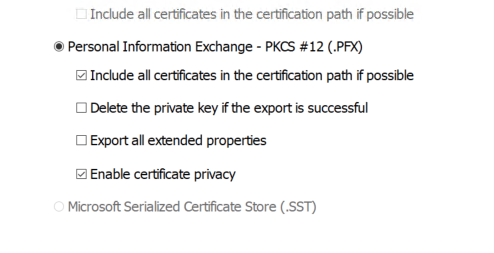
On the Export File Format page of the wizard, accept all the defaults and click Next.
On the Security page of the wizard, select the Password option, then enter and confirm a password. For the Encryption option, select either the SHA1 or SHA256 option, then click Next.

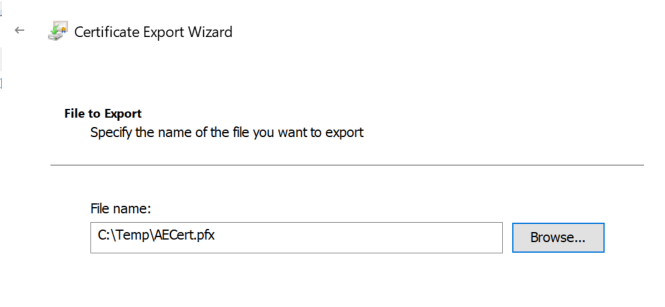
In the File to Export page, provide a name for the file you want to create from the export (or alternatively, browse to a location and provide a name), then click Next.
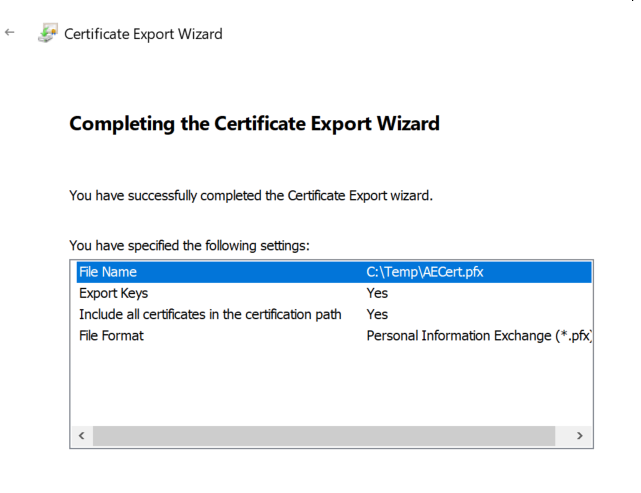
On the Completion page of the wizard, click Finish.
At this point, you need to copy the newly exported private key (.pfx) to the client for installation.
Installing the Private Key on a Client
Before installing the private key on the client, let’s walk though a quick scenario and example. On the client, open SQL Server Management Studio and connect to the server which contains the encrypted data. Open a new query window and select the records from Table_1.
Notice, as expected, the SSN column comes back encrypted. Close the query window.
In SQL Server Management Studio, disconnect from the server, and then click the connect button to reconnect as you did previously. Before connecting, switch to the Always Encrypted tab and click the Enable Always Encrypted (column encryption) option, as shown in the screenshot below. Go back to the Login tab and click Connect.
Open a new query window. Select the appropriate database, in this example AETest, and query all the records from Table_1. The query will error, stating that it cannot decrypt the SSN column because it cannot find the appropriate certificate in the certificate store.
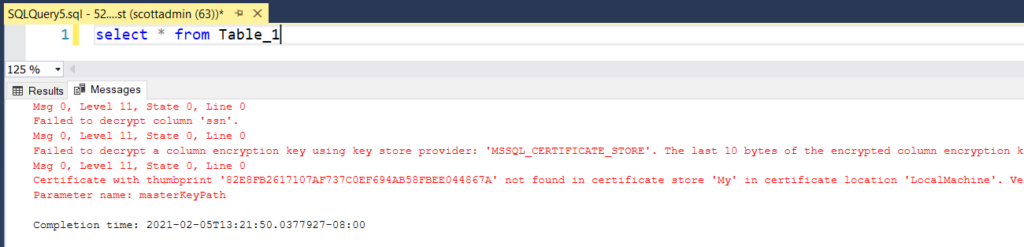
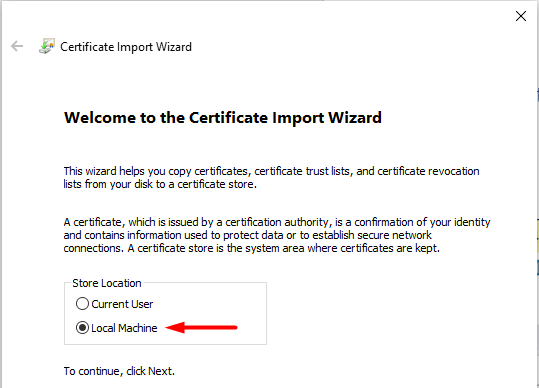
Leave the query window open and open Windows Explorer, navigating to the directory where you copied the private key. Double click the .pfx file to install the certificate.
In the Certificate Import Wizard, select the Local Machine as the store location for the certificate, then click Next.
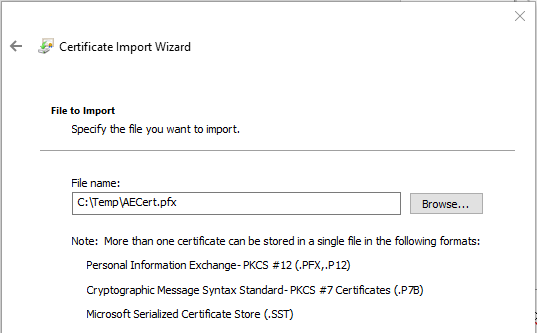
On the File to Import page, accept all the defaults and click Next.
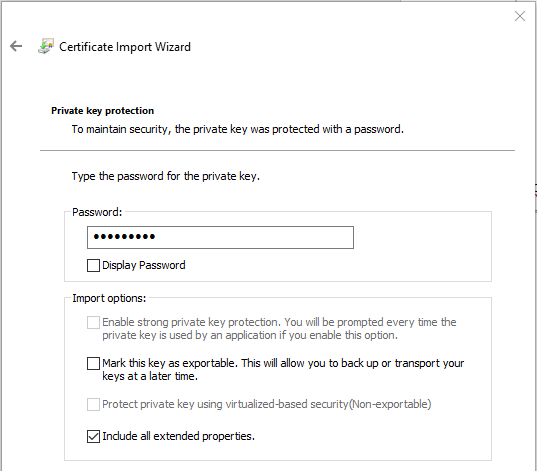
On the Private Key Protection page, enter the password you provided when exporting the private key. Here you also have several import options. By default, the Include all extended properties option is checked. Leave this checked. Additionally, by default the Mark this key as exportable option is unchecked. Leave it unchecked, as you should not need to export the private key from the client. In a perfect scenario, the already exported private key (and associated password) was stored in a secure location. If there is ever a need to re-install the private key, you should get it from the secure location. This prevents many copies of the private key floating around.
Click Next.
On the Certificate Store page, you have two options. On the first page of the wizard, we already told it to put the private key in the Local Computer store. This page gives you the option of telling it where in the Local Computer store to put the private key, or let Windows decide for you.
Select the Place all certificates in the following store option, then click Browse. Navigate to the Personal folder and click OK, then click OK on this page of the wizard.
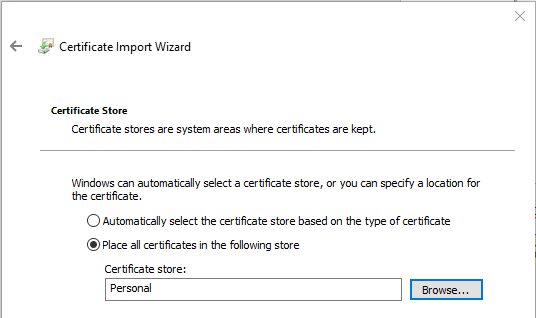
The certificate on the server was also located in the Personal folder for the local computer. Thus, selecting the Personal location on the client keeps everything in the same location.
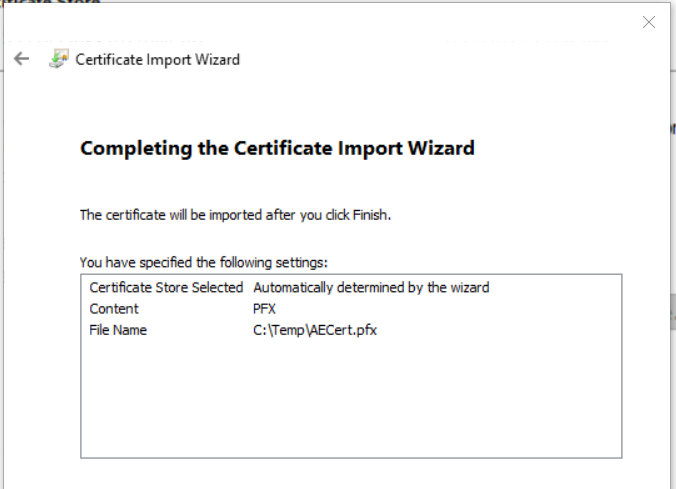
On the Summary page, click Finish to import the private key.
Once you successfully import the private key, return to SQL Server Management Studio and re-execute the SELECT query. The SSN values should now display as plain text:
This walkthrough for SQL Server Always Encrypted should make it easier for you to use this feature. Enjoy!


This Post Has 3 Comments
Pingback: Enabling Always Encrypted in SQL Server – Curated SQL
Muchas gracias por toda tu explicación. Es fantástica.
Gemma
De nada, Gemma. Me alegro de que haya ayudado.